This guide will give you the easiest ways to duplicate masks in Lightroom.
I’ve been using Adobe Lightroom for many years, and I duplicate and invert masks regularly.
Duplicating masks in Lightroom will speed up your workflow and create seamless edits.
Let’s dive into the tutorial.
HIGHLY RECOMMENDED
Popular course reveals the simple tricks to getting incredible results with Lightroom in record time.
Give Your Photos The Look They Deserve!
How to Duplicate Masks in Lightroom
When you use Lightroom’s Develop module, you can quickly adjust hues and tones and add exquisite edits to your photos.
By default, when editing in Lightroom, it unbiasedly adjusts the entire image.
More recently, Lightroom created a mask tool to give fastidious photo editors the creative freedom to modify only one section of an image.
For example, the wedding photo looks hunky-dory, but to create a sublime photo, the bride’s mum’s hat needs to be just a touch more vibrant.
By creating a mask of the mother’s hat, you can adjust the hat’s colors independently without affecting the rest of the image.
This gives you fantastic editing control and opens a world of creative options.
Ok, now we know why we use masks, but why would we ever need to duplicate a mask?
There are a few reasons, such as seamlessly merging two masks, testing creative ideas, and creating an efficient workflow.
1. Create Duplicate Masks to Test Creative Ideas
You can duplicate a mask to experiment with creative ideas in the same area without creating duplicate photos.
Duplicating a mask allows you to test a combination of edits to see which enhancements best suit the image.
Masks can be switched on and off (via a nifty Hide button) so you can view each independently.
This lets you quickly switch from one batch of edits to another without opening and closing separate photo files.
To duplicate a mask, we must first create one. Open your image in Lightroom’s Develop module.
I will use an image of a boat with a landscape backdrop of a lake and mountains.

I want to experiment with different combinations of edits to see which works best for this image.
I will make four masks: one for Hue, Vivid, Dreamy, and Monochrome.
To access the Maksing panel, click the Masking button. It’s under Histogram at the top right of your workspace.
Here, there is a row of five icons. Click the last icon, the dotted circle.

The Add New Mask panel will open; click the first square button in the panel, Subject.
Once clicked, Lightroom’s AI will locate and select the object, which in this case is the boat.

A mask thumbnail will appear at the top right of the canvas, and a translucent red layer will cover the boat.
The red layer indicates which areas are masked. Click the thumbnail when you wish to activate the mask.
To duplicate the mask, right-click its thumbnail, and a drop-down menu will appear.
Click Duplicate “Mask 1”, and a double of the mask will be created.

A new thumbnail will appear under the first mask’s thumbnail.
I’m going to repeat the process to create four more identical masks.

Each new mask will be renamed Mask 1 Copy 1, Mask 1 Copy 2, etc.
It’s easy to become confused and forget which mask is which, so I renamed them to help keep track of them.
Right-click on the mask’s thumbnail and select the first option, Rename.

In the Rename dialogue window that appears, enter a new name; I will name mine after the effect I intend to achieve.

Click the two arrow icons at the top of the mask’s thumbnails to open the Mask panel.
When you are not editing a mask, turn it off. To do this, click the eye icon beside each mask to hide it.
We hide the masks because Lightroom combines all visible overlapping masks as one.
Now that we have created and named the four masks, we can add our edits to each individual mask.
The Hue is altered in the first mask.

The exposure is increased for the second, plus the contrast and highlights by using the sliders.

Using the sliders in the Masking panel, the third mask has its highlights and shadows reduced.
The Saturation is decreased for the fourth to create a monochrome boat, and the Curves are adjusted to increase contrast.

Inverting the Mask
When editing the photo of the boat, I decided the background would look better if its vibrance was heightened.
To edit the background, I create a new mask by right-clicking on one of the mask’s thumbnails and then selecting Duplicate and Invert Mask.

By using the Duplicate and Invert Mask option, I can be assured that the edges of the background mask will match exactly those of the boat’s mask.
Now, I use the inverted mask to increase the landscape’s vibrancy.

After editing each mask, you can flick through them to see which is the best fit for your image.
You can also use the Lightroom Before and After tool to compare each against the original.

This technique will save you oodles of time when trying different editing styles on your photos.
2. Using Masks For Effective Workflow
Using masks, you can edit areas of the mask without risking losing work.
When we delete edits from Lightroom, we cannot delete just one edit independently (unless it was the last one made).
We have to delete all the edits made after this edit. This can be slightly annoying at times.
Duplicating masks is one way around this hurdle until the time comes when Lightroom updates its option to delete single edits from the history panel.
When you delete a mask, it will not affect edits made before or after.

If you wish to delete a mask at any stage, simply right-click the mask’s thumbnail and select Delete “(Name of Mask)”.
3. Flawlessly Merging Background and Subject Masks By Inverting
Another reason you might need to duplicate a mask is to edit a subject and its background separately.
By creating two masks, one for the subject and one for its background, you can independently edit both.
However, when you create a mask of the subject and a new one for the background, you can’t guarantee their edges will join seamlessly.
This is because busy photos make it difficult for Lightroom’s AI to discern where the background begins and ends.
Lightroom’s AI can make a conservative choice, inevitably leaving a large area of the photo between the background and subject unmasked.
Although you can take the time to edit the mask, this can prove to be time-consuming.
In these cases, you will find it is easier to select the subject and invert the subject’s mask rather than select the background straight off.
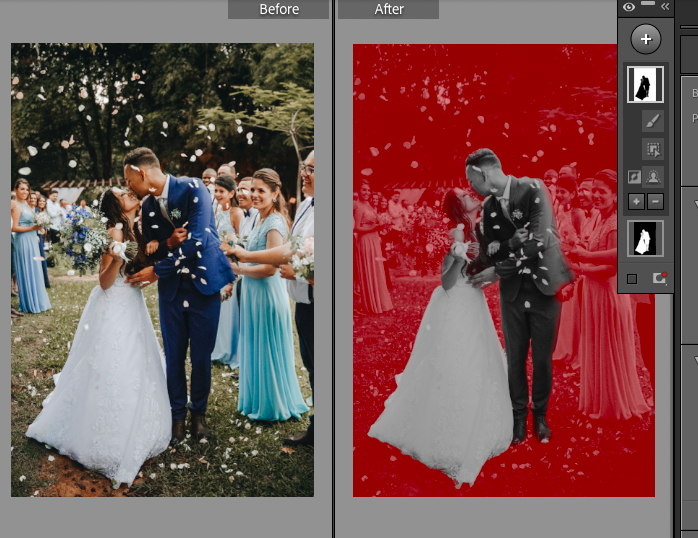
In the image below, a mask of the wedding couple is created, separating them from the background.

As you can see, Lightroom’s AI also included some guests in the selection.

We can remove the guests from the selection using the mask tool’s subtract option.
As you can see in the image above, the edited mask contains only the wedding couple.

The same happens in reverse when we create a background mask; Lightroom’s AI selects the background but does not include the guests.
Editing the background mask to align seamlessly with the first mask will be almost impossible.
And no matter how patient and dedicated you are, you don’t want to waste precious time editing the mask’s edges.
This is when the magic of duplicating and inverting masks comes in to save the day.
Duplicating and inverting the first mask will ensure that all areas of the background are selected. This means the edges of both masks will join flawlessly.
To duplicate a mask, right-click on the mask’s thumbnail at the top right of your canvas.
A drop-down menu will appear. Select Duplicate “Mask 1”. (If you have named the mask, the option will be Duplicate “(Name of Mask)”.)

Once clicked, a duplicate of the mask will be created, and its thumbnail will appear below the first mask.
Getting into the habit of renaming masks can be helpful, as it will help you quickly identify masks if you are working with more than one.
To rename a mask, right-click on its thumbnail and select the first option from the dropdown menu: Rename.
Enter the new name in the Rename dialogue box – I have renamed mine Background – then click OK.
To invert the mask, right-click on the mask’s thumbnail and select Invert “Background”.

The mask will be inverted, and the editing area will be displayed in red.
Now, we can click the couple’s mask thumbnail to edit them independently of their background and then the background thumbnail to edit it.
To get a better perspective on the editing process, you can compare the before and after images.
To do this, use the Before and After preview mode.
Head to the bottom of the image and click the arrow beside the rectangle button containing two Ys, YY.
A drop-down menu will appear; select your viewing mode option from here.

In the image below, we used Develop mode to highlight the couple, illuminating them and setting them apart from their surroundings.
To further frame the couple, we have decreased the background’s saturation.

Now you know how to duplicate and invert masks for more creative control when editing images.
It might seem counterintuitive to make the subject and then invert to select the background, but now you can see why it’s a useful editing trick.
Lightroom just keeps getting better. Inverting masks is now so super easy.
I hope you enjoyed this tutorial and can use masks to improve your photo editing and workflow.
If you liked this Lightroom tutorial, you might also like – Why Photos Look Different in Lightroom vs Photoshop (+ How to Fix Them).
FAQ
How do you duplicate something in Lightroom?
To duplicate a photo in Lightroom, open Lightroom’s Develop module.
Select the image you wish to duplicate from the film strip at the bottom of the workspace.
Right-click on the image, and from the drop-down menu, select Duplicate Virtual Copy.
How to apply a mask to multiple photos in Lightroom?
You can copy and paste a mask to apply the same mask to multiple photos in Lightroom.
To do this, go to Settings in the top menu bar and select Copy Settings from the drop-down menu.
A dialogue window will open. Tick the box beside Masking.
To apply the mask to a different photo, open the new photo and head back to the Settings menu. This time, select Paste Settings.
The settings will be applied to the new photo. Repeat these steps with each photo you wish to add the mask to.
How do I clone something in Lightroom?
To clone something in Lightroom, open the image in the Develop module and activate the Clone tool.
Brush over the areas you wish to clone with your cursor.
To change a cloned area, click Refresh, and the area will be filled with new content.
How do I layer a mask in Lightroom?
You can add multiple masks to an image in Lightroom.
To blend masks, right-click on the mask’s thumbnail. A dropdown menu will open.
From there, select ‘Intersect Mask With…’ and choose an option. Then, use a masking tool to select the areas you wish to combine with the other mask.
Credit : Source Post


