Paris is a night photographer’s dream come true. It’s the City of Light, after all!
What can you photograph there? When is the best time to do it? Which techniques work best?
Read on for an in-depth Paris night photography guide.
5 Locations Perfect for a Night Photoshoot in Paris
You can find a decent shot opportunity nearly everywhere in Paris at night. Yet, some locations tower over the rest.
Let’s take a look at the most popular spots for a night shoot.
1. Louvre
Credit: Johannes Schenk
At night, the Louvre’s glass pyramid is lit up, making it seem even more futuristic than usual.
Tip: Check the light-hours updates before you go. In 2022, officials announced that lights will go out earlier (11 pm rather than 1 am).
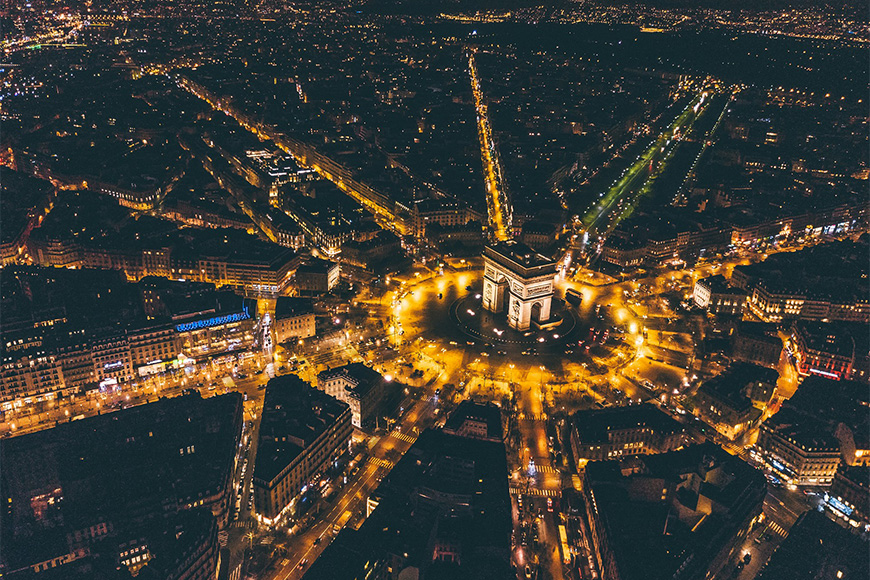
2. Arc de Triomphe

Credit: Zekai Zhu
The Arc de Triomphe looks just as glorious at night as in the day. So, you can either photograph it from a distance (say, from the Champs-Élysées) or go up the Arc and photograph the city from above.
Tip: If you go with the second option, make sure to be there at least 45 minutes before closing time.
3. Place de la Concorde

Credit: Meizhi Lang
The way the ancient Egyptian Obelisk at the Place de la Concorde is lit up at night makes for a great photo.
You can find an angle that gets both the Obelisk and the Fontaine des Mers in the frame.
4. Hôtel de la Ville

Credit: Benh LIEU SONG, CC BY-SA 3.0, via Wikimedia Commons
The facade is lit up at night, which adds even more grandeur to this iconic Parisian building.
5. Pont de Bir-Hakeim

Credit: Pierre Blache from Paris France, CC0, via Wikimedia Commons
Pont de Bir-Hakeim is quite the vantage point. From there, you can view the Seine, the Eiffel Towel, and the France Reborn statue.
Setting the Schedule for a Night Photo Session in Paris
While planning a night photoshoot, you’ll want to check the sunset and sunrise times. The differences between months are not to be taken lightly at all. You can gain (or lose) a couple of hours for your session.
On average, the sun in Paris sets around 9 pm in August. Meanwhile, it sets much earlier in March, going down at around 7 pm.
And, for what it’s worth, December has pretty short days, with the average sunset at 4:55 pm.
How the Location Can Affect Your Schedule
Keep in mind that your itinerary also plays a role.
For instance, you might want to shoot at the Louvre Pyramid long after the museum closes and the crowds disperse.
Well, the Louvre stays open longer on Wednesdays and Fridays. That could throw a wrench in your schedule.
You can push the Louvre after other locations, delay the session a couple of hours, or reschedule for another day.
How Much Do You REALLY Know About Photography?! 
Test your photography knowledge with this quick quiz!
See how much you really know about photography…

How the Photography Technique Can Affect Your Schedule
Sure, you’re shooting at night, but you also don’t want the whole scene to be covered in deep darkness.
Techniques like light trailing (more details later) work best during the blue hour, between sunset and nightfall. That’s when you get a nice balance between the darkness and the low-light sources.
So, consider how you want the photos at each location to look while setting your schedule.
Photographing the Eiffel Tower’s Lights: Legal or Not?
You might have heard about how dazzling the Eiffel Tower looks when it’s lit up with yellow-orange spotlights. So, you thought it would be perfect for a night photo session.
But there’s a hiccup here. The Iron Lady’s lighting is copyright-protected.
It’s fine for a tourist to photograph the Eiffel Tower at night and share the photos on social media. Professional photographers, on the other hand, might need prior authorization. There could be fees to pay as well.
To stay on the safe side, you’ll want to get in touch with the Eiffel Tower’s management company and double-check that your photoshoot won’t infringe on any copyrights.
3 Technical Tips for Light Trail Night Photography in Paris

Credit: Riccardo Bertolo
With long exposures, you can capture the movement of light, creating a nice trailing effect around the subject.
The key here is that you want your subject to be perfectly still while the light sources (usually car headlights) move before the shutter closes.
1. Know Your Camera Settings
For this technique to work, you want low ISO. Then, to compensate, you’ll want to use a long shutter speed (5–60 seconds) to capture the light motion across the frame.
As for aperture, f/16 is a good place to start.
2. Put the Light Trails in Context
Without a clear Parisian “subject,” people won’t be able to tell where this image of blurred cars was taken. It could be in pretty much any city in the world.
But if a landmark like the Arc de Triomphe is the focus of the image? That’s a dead giveaway that the photo was taken in the City of Light itself.
The Moulin Rouge is also a good candidate for light trail photos.
3. Reduce Digital Noise
The light trail settings mean that the light will enter the camera for longer periods of time. Any bump or shake, no matter how small, will blur your subject.
To avoid that, use a tripod. If you’re working on busy streets, you might have to work out the logistics. For instance, you might have to look for a pedestrian island if you’re at Champs Élysées, photographing the Arc de Triomphe.
That said, shakes could happen even with a tripod. That’s usually either because you caused vibrations as you pressed the shutter release button or there’s too much wind.
To tackle the first issue, use a timer or a remote shutter control. As for the second issue, you could stabilize the tripod by hanging your camera bag on the weight hook.
Aside from those two preventative measures, you can shoot in RAW format and use a noise-reduction filter.
Find out more in our guide to photographing light trails.
Final Thoughts
No matter where you decide to set your tripod, we recommend starting your session with a few test shots. Experiment with the settings, angles, and light until you get that magical shot!
Credit : Source Post


