This guide will give you the easiest ways to create a gorgeous glow effect in Lightroom.
Adding glow effects to photos helps add a summer ambiance or emulate a dreamy, romantic atmosphere in an image.
I often find this useful in my photo editing work to take natural light shots to the next level.
Let’s dive into the tutorial.
HIGHLY RECOMMENDED
Popular course reveals the simple tricks to getting incredible results with Lightroom in record time.
Give Your Photos The Look They Deserve!
How to Make a Glow Effect in Lightroom
A glow effect creates a soft, radiant light that is reminiscent of hazy sunlight on a warm summer day.
The glow effect can be used to add fairytale magic, a romantic touch, or a dreamy quality to a photo.
Professional wedding photographers use the glow effect to highlight the romantic element between a couple. If you’re photographing children or families, you might use it to amplify tenderness.
If you’re wondering which images to use the glow effect on, I would suggest using the glow effect on images with direct sunlight.
When sunlight illuminates an isolated section of an image, it can focus the viewer’s eye on the highlighted area.
The glow effect can be used to soften the image’s mood and expand the area of focus.
Direct sunlight can also create too much contrast in an image, producing a harsh, unwelcoming atmosphere.
Soft, warm light effectively blurs harsh contrasting light, while hazy, unfocused light blends the elements of an image together.
Let’s get started. We’ll show you how to make your chosen images glow with radiant magic.
Step 1 – Open the Image
Head to your Lightroom Library and select the image to which you wish to add the glow effect.
Click on the image to select it, then click the Develop button at the top of the canvas workspace.

The image will open in Develop mode.
As you can see, the chosen image has a ray of direct light. The ray of light cuts straight through the image, dividing the composition and distracting the viewer’s eye.
Not only does the ray of light divide the photo, but it makes it makes it look cold and uninviting.

The first step is to plan how you want the final result to look.
Decide where you wish to add the glow, how large you wish the glow effect to be, and how bright you wish it to be.
Different shades and sizes will affect the glow’s impact on the final image.
For the above image, we want to add a hazy, warm glow to soften the photo and create a dreamy summer day atmosphere.
To do this, we will add two medium-sized glow effects. One, over the daisies in the foreground. The other, in the top left area, will be over the trees.
Step 2 – Open Radial Gradient
The next step is to create a Radial Gradient. To do this, click the circle icon under the Histogram on the right-hand side of your workspace.
Once clicked, a panel will open.

Click Radial Gradient or hit Shift + M for the keyboard shortcut.
Once clicked, the Radial Gradient panel will open.
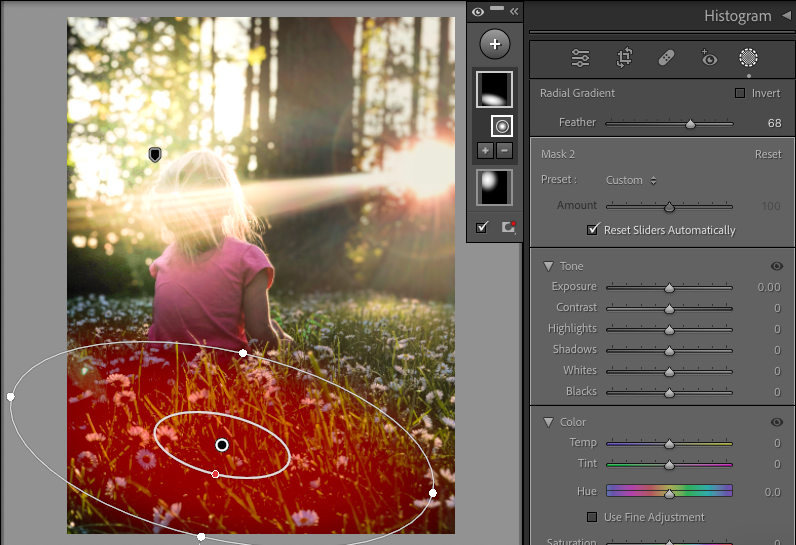
Step 3 – Create a Radial Gradient
Click on the image where you wish to create the gradient’s center. Now, drag your cursor to create the desired radius size.
You will see two circles appear, indicating the radius of the Gradient.

A mask will be created, and a square thumbnail to indicate this will be displayed on the top right-hand side of your image.
The white blob in the square thumbnail demonstrates the location of the Radial Gradient in the image.
You can add more Radial Gradients or masks by clicking the plus button, but first, we will perfect the first Gradient.
Step 4 – Adjust Gradient Settings
The first edit setting in the Radial Gradient panel is the Feather slider.
I have increased the feathering from the default setting of 50 to 65 to create a hazy light effect.
The next editing options are in the Tone panel.
The Tone panel contains sliders to edit the Radial Gradients: Exposure, Contrast, Highlights, Shadows, Whites, and Blacks.

To achieve a Glow Effect, we want a soft, warm Radial Gradient that creates a diffused light.
To do this, we will increase the Radial Gradients’s Exposure by sliding the Exposure slider to the right.
Adjust the sliders to suit the image, remembering that the aim is to warm and lighten the image.
Step 5 – Adjust Color
Under the Tone panel, you will find the Color panel.
Slide the Temp Slider to the right to increase the Temp. This will increase the warmth of the image.
Next, adjust the Hue setting. You can change the Radial Gradient to any hue, but the glow effect is best suited to a yellow hue.

As you can see in the image below, the Hue has been adjusted to a green hue.
Although this is an interesting effect, it does not generate the warm glow we are looking for.
Increasing the saturation will heighten the warm tones and magnify the feeling of summer days and comfort.
Step 6 – Adjust the Curve
Click the triangle symbol beside Curve to open the Curve graph.
To adjust the Curve, click on the graph and drag the white line above or below the black diagonal line.
In the image below, we have brightened the Radial Gradient by dragging the Curve line upwards.

You might not need to use the curve if you have already adjusted the image’s exposure.
Step 7 – Effects Settings
The next box in the Develop panel is the Effects box. Click on the triangle beside Effects to open it.
You can alter the Texture and Clarity slider if you like, but the slider we use to create a glow effect is the Dehaze slider.
We slide the Dehaze slider to the left to decrease the image’s definition.

Don’t slide it too far to the left, or you will lose all definition. We don’t want to turn the image into one big glowing blob.
Also, be careful not to smear the image’s finer details. You don’t want to lose interesting features, such as the definition of flower petals.
Step 8 – Create more Radial Gradients
One Radial Gradient might be all you need to generate the perfect summer ambiance for your photo.
However, if you think the image needs more of a romantic boost, there’s nothing stopping you from adding another Radial Gradient.
To add another Radial Gradient, click the plus button on the top right-hand side of the image over the first Radial Gradient’s thumbnail.
A drop-down menu will appear; scroll down the menu and select Radial Gradient.

Once clicked, another square thumbnail will be added; this indicates a new Radial Gradient mask has been created.
To create the next Radial Gradient, click on the image. Then, drag your cursor outward to create the desired radius size, and release the cursor.
You can adjust the size and radius of the Radial Gradient by hovering the cursor over the Gradient.
When the rings of the Gradient appear, click down on the canvas workspace and drag the radius inwards or outwards.
You can change the shape from circular to oblong if you wish.

You can alter the size of the Gradient at any stage during the editing process.
Step 9 – Tweak or Delete Edits
If you’re not happy with an edit, you can delete it.
To remove one or more edits, you can use the History panel. Click the triangle beside History on the left-hand side of your workspace.
This will open the History panel. You can delete the last edit or a sequence of edits.

Please be aware that if you delete an edit in the sequence of edits, all edits that were made after this edit will also be deleted.
If you’re unhappy with an edit and wish to adjust it, click on the Radial Gradient’s thumbnail.
Once the mask is active, the Radial Gradient editing panel will jump open, displaying the Radial Gradient’s settings.
You can now re-adjust any previous edits.
For example, if the Radial Gradient’s hue is too red for your liking, you can adjust it by clicking on the Hue slider.
Using this method, you can adjust edits or delete Radial Gradients at any stage of the editing process.
Step 10 – Final Comparison
When you’re happy with your edits and have finished editing, click View Mode under the image.
Select to view the Before and After preview of the image.
This preview helps you gauge if you have applied the correct edits.
As you can see in the image below, the glow effect has been used to soften distracting light rays and intense sun glare in a photo.

We have taken the image and tweaked it using the glow effect to simulate the atmosphere of a warm summer day.
Without the glow effect, the child appeared isolated and cold. The glow effect has helped soften contrasting areas of an image.
The darker shaded areas of the image have been blended into each other, and harsh lines are concealed.
This has given the photo a dreamy, ethereal, welcoming quality.
Step 11 – Save the Image
To save the applied edits, close your image or select a new one from the Library to edit.
I prefer to add glow effects manually, but if you want to add a warm glow effect in one quick click, you can try using a Lightroom preset.
Check out the Lightroom presets in this guide: Most Popular Must-Have Lightroom Presets.
Add Glow Effect to Background in Three Quick Steps
You can try this alternative method if you want to add the glow effect to an entire area, such as a background.
It’s visually effective, plus easy and quick to do.
Step 1 – Select the Subject
Click on the Circle icon in the Develop panel below the Histogram.
This will open the masking options. Click Select Subject. Lightroom’s AI will take a few moments to select the subject.
When the subject has been selected, click the Invert button at the top of the panel.
Lightroom will now mask the area behind the subject. A thumbnail demonstrating the masked area will appear at the top right of your canvas.

Alternatively, you can click Select Background. The background area will now be covered in red to demonstrate which parts have been masked.
Step 2 – Adjust Curve
Click on the triangle beside the Curve to open the Curve graph.
Drag the curve line upwards using your cursor to lighten the image slightly.
Step 3 – Adjust Dehaze
Click the triangle beside Effects to open the Effects editing options.
Slide the Dehaze slider to the left to increase the haze, giving the image an out-of-focus appearance.

In the image above, the Dehaze slider is set to -71.
This makes the image’s background look washed out and overexposed.

Sliding it back to -19, we achieve the perfect background glow effect.

As you can see in the Before & After preview above, the light haze and brightening of the image create the desired glow effect.
We hope you enjoyed this tutorial and can use the glow effect to add romance, magic, and warmth to your images.
If you enjoyed this tutorial, you might also like to check out – How To Smooth Skin and Fix Skin Tones in Lightroom.
FAQs
How to get a glow effect in Lightroom?
To get the glow effect in Lightroom, you can use the Dehaze tool.
The Dehaze tool not only dehazes an image but can also be used in reverse to add haze to an image.
First, use the mask tool to mask the area you wish to add the glow effect to. Then, slide the Dehaze slider to the left to add haze.
You will notice that the Dehaze action softens the image by adding a slight out-of-focus haze while brightening it.
How to create a dreamy effect in Lightroom?
The best way to create a dreamy effect in Lightroom is to lighten and soften the image’s focus.
One way to soften the focus is to decrease the image’s texture. You can decrease an image’s texture in Lightroom by sliding the Texture slider to the left.
Another way to add a dreamy effect is to decrease the contrast of the image’s mid-tones. To do this, slide the Clarity slider to the left.
Lastly, slide the Dehaze slider to the left to soften the image’s focus and increase overall brightness.
How to do the glow effect on pictures?
You can make the glow effect in Lightroom by using the Radial Gradient tool.
Open the Radial Gradient, click on the image, and drag the cursor to specify the gradient mask’s radius.
Use the sliders in the Develop mode on the right-hand side of your image to lighten and soften the focus of the Radial Gradient.
How do I add light effects in Lightroom?
You can use the Linear Gradient, Radial Gradient, or Brush to add light effects in Lightroom.
The Linear Gradient is used to create a streak or ray of light. The Radial Gradient is used to create glow spots and light haze.
The Brush can be used to create different styles of light. When using the Brush tool, make sure to create a mask over the area you wish to lighten for editing control.
How to add light streaks in Lightroom?
The best tool to use to add light streaks in Lightroom is the Linear Gradient.
Activate the Linear Gradient tool and drag your cursor across the image to indicate where you wish to add the ray of light.
Adjust the properties of the light streak by adjusting the Develop Mode sliders when the Linear Gradient mask is active.
Credit : Source Post


