This guide will give you the easiest ways to use Lightroom’s Effects panel.
I’ve used Adobe Lightroom for many years and use the Effects panel every day.
The Lightroom Effects Panel helps you apply a perfect vignette effect and film grain to your photo post-production.
Let’s dive into the tutorial.
HIGHLY RECOMMENDED
Popular course reveals the simple tricks to getting incredible results with Lightroom in record time.
Give Your Photos The Look They Deserve!
How to Use the Effects Panel in Lightroom
The Effects panel can be found in Lightroom’s Develop module and is used to replicate photographic techniques or enhance photos.
Using the Effects panel in Lightroom, you can create interesting aesthetic effects, such as a vignette or film grain.
These effects can be created using a camera, but if you want complete editing control, adding them post-production is the best option.
Ok, so let’s take a look.
Step 1 – Select an Image
Select the image you wish to use from Lightroom’s Library.
If you plan to add a vignette, ensure there is excess space at the image’s edges to add the border.
There doesn’t have to be a vast amount of space around the image, just enough to fit the vignette.
Click the image and hit Develop at the top right of the workspace.

For this tutorial, I will add a film grain and vignette to a retro-style photo of a girl resting on a car boot.
Step 2 – Crop the Image
If you plan to crop your image in Lightroom, it’s worth doing this before you add the vignette effect.
Although the vignette effect moves with the crop action, cropping before adding the effect will allow you to preview how the vignette looks on the final dimensions.
To crop the image, click the Crop icon. It is the second icon in the toolbar directly under Histogram.

The Crop editing panel will open. To crop your picture, drag the handlebars of the crop’s border into position.
I have dragged the crop’s handlebars to position the girl centrally.

Alternatively, click Original beside the lock key icon, and a drop-down menu will appear.
Select a ratio or enter a custom crop size.

Now, click the Aspect button and drag your cursor over the area of the canvas you wish to select.

If you wish to angle the crop, adjust the Angle slider. A live preview of the rotation will be displayed in the canvas workspace.
Step 3 – Open the Effects
Now that your image is cropped, you’re ready to get creative.
Scroll down the editing panel on the right-hand side of the workspace and click Effects.

The Effects editing panel will open.
If you’re using the Lightroom Mobile App, click the Effects button underneath your image.
Step 4 – Apply a Vignette Effect
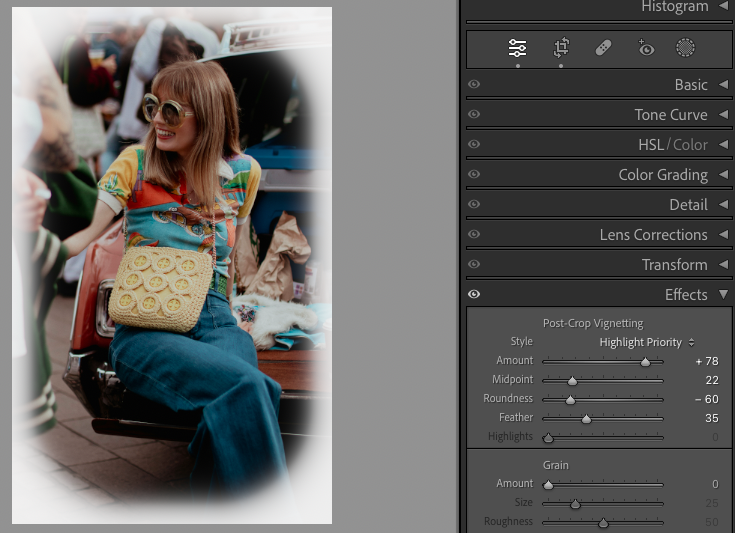
The Post-Crop Vignetting section is at the top of the Effects panel.
Here, you will find five vignette sliders: Amount, Midpoint, Roundness, Feather and Highlights.

In the Lightroom Mobile app, the Amount slider is called Vignette.
Using these sliders, you can alter a vignette’s size, shape and transparency.
Let’s run through each slider and how to use them, so you can create the ultimate vignette effect for your photos.
Amount Slider
The first slider is the Amount slider in Lightroom Classic or the Vignette slider in Lightroom Mobile. The further this slider is moved to the right, the lighter and less transparent the border will become.
When positioned centrally, no vignette effect will be applied to the image.
As you can see in the image below, the Amount slider is set to + 100, and the vignette effect is pure opaque white.

The border turns black when the Amount slider is moved to the left (or into negative numbers).
Keep the slider close to the center if you want to create a transparent vignette.

In the image above, the Amount slider is set to – 100. As you can see, aside from the feathering action, we now have a solid jet-black border.
A white border lifts an image, adding a sophisticated, professional look. The dark border generates an intense, dramatic mood.
Midpoint Slider
The Midpoint slider alters the width of the vignette border. It ranges from zero to one hundred.
In the image below, the Midpoint slider was moved entirely to the left and set to zero. The result is the widest vignette possible.
This vignette creates an intimate mood and draws attention to the girl. However, in this photo, it dominates the canvas, creating a claustrophobic atmosphere.

In the following image, the Midpoint slider was moved to the right and set at 72, decreasing the width of the border.

The vignette border will almost entirely disappear if the Midpoint slider is moved to 100.
Roundness Slider
When adjusted, the Roundness slider changes the shape of the vignette from circular to rectangular.
Moving the slider to the right (into positive numbers) will create a circular vignette.

When moved to the left, the Roundness slider creates a rectangular-style vignette.

The rectangle shape can be used to add a unique contemporary vibe.
Feather Slider
Using the Feather slider, you can add a slight blur to the edges of the vignette’s border to soften the effect.
The Feathering technique gradually fades the photo into the border for a smoother visual transition.
A feather effect can be subtle or harsh and can be used to add depth to a photo or create dramatic focus.
Move the Feather slider to the right for a translucent edge.

Or move it to the extreme left if you want a hard line with absolutely no feathering.

For an eighteenth-century photographer, avoiding vignetting was nearly impossible. What could a Victorian photographer do but embrace the dramatic, moody borders and incorporate them into their creative vision—and that’s exactly what they did.
This dark vignette is due to the limitation of some camera lenses. It still happens today in wide-angle optics.
Today, we can add the vignette effect post-production to replicate vintage photos.
If you wish to replicate an eighteenth-century vignette, add a dark circular vignette with slight feathering.

I’ve used the vignette to focus the viewer’s eye and give the photo a retro-faded look.
Use the vignette effect to your aesthetic advantage and enhance your image.
Step 5 – Apply the Grain Effect
The second section of the Effects panel is dedicated to grain.
The Grain section has three sliders: Amount, Size and Roughness.

The Amount slider must be more than 0 to apply a grain effect.
If the Amount slider remains on 0, no change will be made to the photo, even when the other sliders are adjusted.
The Amount slider determines the amount of grain—in the image below all sliders are set to 100.

The Size slider determines the size of the grain.

The last slider, the Roughness slider, creates the gritty rough effect.
If the Roughness slider remains on 0, the image will appear blurred rather than grainy, as in the image below.

Experiment with different settings to achieve the grain effect you desire.
Adding grain to your photo replicates the look of the film grain effect, making it look retro.
Alternatively, you can use grain to make your images look rough and gritty.
Lightroom Mobile App & Lightroom CC
Lightroom CC and the Mobile app have three extra adjustment features with a slider for each: Texture, Clarity and Dehaze.
The same editing features can be found in Lightroom Classic. However, you won’t find them in the Effects panel. Instead, they are located in the Basic editing panel under Presence.
As a side note, be warned if you add the Texture, Clarity or Dehaze effect after adding a vignette—the effect will also be applied to the vignette.
So, if you’re going to add a vignette, add it last.

Texture Effect
The Texture effect is applied to medium-sized details. Slide the Texture slider to the right to increase texture.
This effect can be used to amplify an image’s texture without affecting finer details.
Slide the Texture slider to the left to decrease texture. This is a popular way to soften skin and remove fine lines from portraits, a surefire way to make older clients happy.
Clarity Effect
The Clarity effect increases an image’s clarity. It can be used to sharpen the outlines of objects in an image.
The Clarity slider concentrates on the mid-tone range. When the slider is slid to the left, the tones are lightened. When moved to the right, the photo’s mid-tones darken.
This effect is favoured by landscape photographers who use it to enhance colors and draw out the landscape’s details.
When applied to portrait photos, it will accentuate lines and add an interesting, impactful punch.
Dehaze Effect
True to its name, the Dehaze effect will reduce haze in your image. It does this by adding contrast and saturation to your photo.
It was first designed to quickly remove fog, mist or smoke from photos, increasing the saturation and contrast in areas of the photo that are low contrast.
In theory, it could also be used to add mist to a photo, and it’s worth giving it a shot. Instead of sliding the Dehaze effect to the right, slide it to the left to decrease saturation and contrast to achieve a soft haze effect.
The Dehaze effect is more effective when used on landscape photos than portraits.
Well, that’s it for the Effects panel. I hope you found this tutorial useful.
You can achieve these effects when shooting live, but few people are willing to ditch their awesome new camera or lens to use an inferior one.
The Effects panel can be used creatively in post-production to evoke moodes or replicate vintage photo effects.
Remember, the key is to enhance the photo without making the effect too obvious.
I hope you enjoyed this tutorial and are ready to add vibrant and interesting effects to your photos.
If you liked this tutorial and want to learn more about Lightroom, check out – 5 Popular Effects in Lightroom + How to Create Them.
FAQ
What is the Effects panel in Lightroom?
The Effects panel in Lightroom replicates photographic techniques or effects.
Using the Effects panel, you can add a vignette or film grain effect to a photo like those commonly seen when photographers use analog cameras.
Adjusting the vignette and grain sliders will create the desired effect.
How do I add effects in Lightroom?
To add effects in Lightroom, you can adjust the Effects panel’s sliders or add a Preset.
A Preset is a group of editing steps that can be applied to a photo with one click.
The Effects panel adds a vignette or grain effect to a photo.
How do I use Lightroom overlays?
You can use Lightroom overlays to mask selected areas of a photo.
When the image is masked, you can edit it independently from the rest of the photo.
Open the image in Develop mode to access overlays and click the Masking button.
Now, select a masking option under Add New Mask.
How do I pull up the Effects panel?
To pull up or open the Effects panel in Lightroom, click Develop in the top right to open the image in the Develop module.
Scroll down the editing panel on the right-hand side of the canvas and click on Effects.
The Effects panel will now open.
HIGHLY RECOMMENDED

Popular course reveals the simple tricks to getting incredible results with Lightroom in record time.
Give Your Photos The Look They Deserve!
Credit : Source Post


